Have you ever wondered what goes into dyeing textiles? It’s something that people have been doing for centuries. These days, we go to stores to buy clothing, home décor items and a variety of other things made using textiles that were dyed on a large scale. But what about the techniques people used over the ages to dye fabric?
Today, we’re going to have a look at dyeing processes done on a small scale by artisans dedicated to textile arts. As usual, we’ll start with a brief history, then we’ll learn about different types of dyes and different methods artisans use to create their unique pieces. I’m also going to introduce you to Jane Jacobs, a textile artist using Eco Printing as her medium.
There’s a lot of material to cover, so let’s get going!
Defining Dyeing
We can define dyeing as the applying of pigments to a textile, be it fabric, yarn, thread or other fibre. The goal is to colour the textile to the desired hue making sure the dye is colourfast. Dye molecules actually stick to the fibres by being absorbed or they’re bonded to the fibres using temperature to control the process. If the bond is strong, the fibres will have more colourfastness than if the bond is weak. This is why some fabrics fade much faster than others.
Brief History of Fabric Dyeing
Textile dyeing doesn’t just date back centuries, it dates back approximately 34,000 years!
The oldest dyed flax fibres were found in a cave in the Republic of Georgia. Dyed textiles have been recovered from other settlements dating back 10,000 years where traces of what is thought to be dye using red ochre extracted from clay have been found.
Natural dyes were either extracted from plants or animals.
Tyrian purple, better known to us as royal purple, has an interesting history. It was manufactured using the mucus of Murex snails. Yucky, right?

Murex snail, Source: tumblr, sartorial adventure
These dyes are thought to have been used to dye Phoenician textiles as early as 1570 BCE. Some historians suggest that the name Phoenicia means ‘land of purple’.
Manufactures of Tyrian purple kept their sources and the complicated process required to create the pigment a secret. Since this pigment was extremely expensive to make, its colour became associated with wealth, power and became a status symbol of sorts.
The Greeks and Romans continued using Tyrian purple for their textiles but in a very limited way. In 4th century Rome CE, only the Roman emperor was permitted to wear Tyrian purple. It’s interesting to note to that this colour was also prized because it was resistant to weathering and sunlight.
Evidence suggests natural dyes like plants, barks and even insects were used by the Chinese 5,000 years ago.
Natural insect dyes using Cochineal beetle which made carmine coloured pigment and Kermes insects which made crimson pigment date back to the early Egyptians. It is estimated that it took a large season harvest to produce any insect dyes as 17,000 dried cochineal beetles are required to produce just one ounce of dye.

Cochineal beetle, Source: unknown
In the Middle Ages (5th to late 15th centuries), Kermes dyes were used to create rich crimson and scarlet dyes. Animal based textiles like wool and silk were best for insect based dyes giving them the best hue and colourfastness.

The Coronation Mantle of Roger II of Sicily, silk dyed with kermes and embroidered with gold thread and pearls. Royal Workshop, Palermo, Sicily, 1133–34. Kunsthistorisches Museum, Vienna. Photo: MyName (Gryffindor)
Vegetable dyes including madder red and indigo blue were also used in antiquity. These two were particularly important pigments introduced to other regions of the world through trade strengthening the economies of both Asia and Europe. This didn’t change until the discovery of synthetic dyes in the middle 19th century.
The first synthetic dye was created by William Perkin around 1856. It was purely by accident, or so the story goes. Perkin was searching for a cure for malaria. He used coal tar as the pigment and called it mauveine.
In 1869, the first natural pigment was duplicated synthetically. Alizarin was created using the red dye in madder.
As the development of synthetic dyes grew, more colours quickly came to market. By the 1870’s, the use of natural dyes for commercial uses had all but disappeared.
Types of Dyes
There are only two types of dyes: Natural and Synthetic. All natural dyes come from nature while synthetic dyes are man-made.
Natural Dyes:
Natural dyes can be considered to be animal or plant based. As we learned earlier in this post, Murex snail, cochineal beetles and kermes insects are considered natural dyes. Most of us won’t be using animal based natural dyes, but we can use plant based natural dyes with flora we have at hand.
Here are some pros and cons to consider when it comes to natural dyes:
They can create beautiful, natural colours.
Since they come from plants, they are biodegradable and less likely to contaminate soil, water sources or be harmful to us.
Colours of natural dyes are seasonal. Spring, summer and fall will give you different colour palettes to work with.
Colours can’t be reproduced over and over again. This is both good and bad. If you’re looking to create one-of-a-kind dye colours, natural dyes are for you. If you’re looking for repeatability, then they’re not what you should be working with.
Colours tend to fade over time.
Natural dyes can’t be created in and used in large batches.
The most popular plant based dyes today continue to be madder and indigo. Madder is said to be the most reliable red dye available. Both madder and indigo need a high yield of plant product to make batches of dye.

Natural dyed skeins of yarn with madder root, Colonial Williamsburg, VA
Source: By Madison60 - Own work, CC BY-SA 3.0, https://commons.wikimedia.org/w/index.php?curid=19010845
Here’s an interesting video I found by Ryoya Takashima that’ll show you step-by-step how the indigo plant is used to dye fabric the traditional Japanese way.
When you’re thinking about dyeing fibres naturally, you can use just about anything. Carrots, onion skins, marigold flowers and different spices can all create beautifully dyed colours for your wearable artwork.
One thing to keep in mind about natural dyes is that no two batches will ever be the same. If you’re looking for originality, natural dyes are the way to go. You can get creative and try out different plants from your garden or think about some of the brightly coloured vegetables you have in your kitchen. I think beets might just make a fabulous magenta. What do you think?

Source: Dream Factory
**Check out the link. Great info on how to dye using these natural ingredients.**
FYI – Cochineal beetles are probably not something you’ll want to use to dye your fabrics with naturally. You may be thinking that was something used centuries ago in dyeing processes. Well, you may be surprised to find out that they’re still used today. Carminic acid, which is still made using dried cochineal beetles, is used today in a variety of products that contain red dye. It’s primarily used as a colourent in food and lipstick! Yikes!
Synthetic Dyes:
Synthetic dyes are manufactured using organic molecules but there’s nothing natural about them. They’re made up of chemical compounds that can have harmful effects on us and our environment. Some of these ingredients may surprise you: petrochemicals, mercury, lead, chromium, benzene and copper to name a few.

Source: Love to Know
When it comes to synthetic dyes, there are many classifications:
Acid Dyes – are water soluble and can be applied to wool, silk, nylon, acrylic and polyester fibres.
Azoic Dyes – fibres are subjected to dyeing then treatment with another chemical to bond the dye to the fibres.
Direct Dyes – are best used on cellulose fibres like hemp, cotton, linen and sisal.
Disperse Dyes – are used to dye acetate fibres which dry fast, don’t wrinkle and are soft to the touch.
Basic Dyes – are brightly coloured but have little in the way of colourfastness and have limited use on cellulose and protein fibres such as wool and silk.
Pigment Dyes – are not really dyes but insoluble coloured particles that, when added to a liquid fibre, actually become part of the synthetic fabric. Their colourfastness is very good compared to other processes.
Reactive Dyes – create bright colours that have good colourfastness. They can be used with cellulose fibres, silk, wool and nylon.
Sulfur Dyes – are insoluble but by adding sodium polysulphide, they become soluble. Their colourfastness is very good. These dyes are inexpensive and easy to apply but colours have been traditionally limited to black, brown and navy blue.
Vat Dyes – this is a tricky one but here goes: these are insoluble in water but can be made soluble when alkali is mixed into them. By oxidizing the dyed fabric, simply bringing it in contact with oxygen, the vat dye becomes insoluble to water again. Fibres dyed this way have excellent colourfastness and are made into things like work clothes, drapery fabric and sportswear.
The upside of using a synthetic dye is that you’ll get the same colour every time.
Like most things, it’s best to read labels if you’re going to use synthetic dyes and are concerned about their toxicity.
Natural Dyeing Processes
Since we’re interested in how artisans produce small batches of dye for their unique textile art creations, we’re going to look at a few interesting dyeing processes that you can try yourself, one of which has been around for centuries.
Shibori:
We’ve all seen a tie-dyed T-shirt. Most of us probably have one tucked away somewhere in a drawer. But, do you know what Shibori is?
Shibori can be defined as the traditional Japanese technique of tie-dyeing. The patterns are based on centuries old methods of folding and binding fabric before they’re placed into indigo dye.

Source: The Farmington Libraries
The six methods of folding and binding are:
Kanoko Shibori which is similar to the tie-dye we all know and love
Miura Shibori is known as looped binding
Kumo Shibori is a pleated and bound resist method
Nui Shibori is a fabric gathering method wrapped tightly around a wooden dowel
Arashi Shibori is a method in which fabric is wrapped around a wooden dowel, tying it down, then scrunching the fabric together on the dowel
Itajime Shibori is a shaped-resist technique in which the fabric is sandwiched between two pieces of wood.
You’re probably wondering how these Shibori methods are actually done and what the patterns look like once the fabrics are out of the indigo dye. Well, I have the perfect video right here. It’ll walk you through how each of these methods is done and it’ll show you the results, Thanks, Sarah!
Eco Printing:
Over the past few years, eco printing has picked up speed and become very trendy with many artisans. It’s a term coined by Australian artist India Flint.

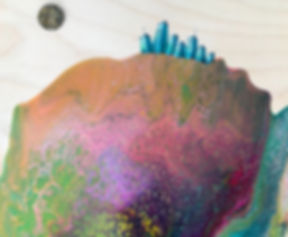
Source: madebybarb.com
Simply put, eco printing is a method of contract printing. The process requires the layering of natural materials such as leaves, flowers and plants onto fabric, creating a design. The fabric is then rolled up around a piece of PVC pipe or a wooden dowel and tied securely. It’s then steamed or simmered in a pot of boiling water. This allows the natural colouring of the materials to stain the fabric.

Source: Sharlene Bohr
Rust Dyeing:
The process for rust dyeing is the same as it is for eco printing. It’s actually considered an eco printing technique. Instead of using natural objects, artisans use metal objects like gears, nails and whatever they can find that will rust in water.
The colour palette for this method varies from orange to red to dark brown, depending on the various degrees of rust infusing the fabric.
One thing that’s different though from eco printing is that you can use the objects in rust dyeing over and over again. In fact, as they rust more thoroughly, you’ll end up getting stronger colouration on your fabric.

Source: Pinterest
Caution: make sure your tetanus shot is up to date if you’re going to be using this technique!
These last two methods definitely look like a fun method to me. You never know what you’re going to get until you unroll the fabric and have a look!
There is a lot more that we could talk about when it comes to textile arts but I think we should wrap it up here. We still have to meet out 3T Art Blog Guest artist! Let’s do that now.
3T Art Blog Guest Artist – Textile Printing Artist Jane Jacobs
I’d like to introduce you to Jane Jacobs, a dedicated textile artist who creates her unique pieces of wearable art using the process of Eco Printing. She’s been working with this method for many years. We’re going to learn about her and the process she follows to create beautiful fabrics that she then turns into clothing, home décor items and many other usable items.

Jane (in the black tank-top) teaching a workshop
Jane’s creative influences run deep. She was raised in a family where creativity was an important aspect of growing up.
“I come from a creative family and I have always created, usually textiles as that's what has appealed to me. But when I found eco printing, I knew I'd found what I loved to do.”

Jane has spent years learning her art. When she first started eco printing, it wasn’t a main-stream medium. She had a hard time finding other artists who work in eco printing let alone artists who taught it. Over the years, she’s been able to find and participate in a number of courses with world renowned eco printers. She just recently took another course with an eco printer in Ireland.

At this point, Jane isn’t a full-time artist yet, but hopes to be soon! Looking at her beautiful eco printed fabrics, I know she’s going to be very successful.
When asked what inspires her, Jane’s says that it’s God's amazing world. She takes fallen maple leaves, something that will be trodden on or swept up and put to the curb in yard waste bags and uses them to make beautiful marks on fabric.

“My favourite medium is making dresses with my eco printed silk but as they can be expensive, I also do scarves, pillows, recently ties and am trying to eco print successfully on revived clothing.”

Jane’s favourite thing is to eco print on lengths of fabric that can then be made into clothing. She says that doing smaller pieces is a good way to experiment with different techniques and plant material.

“My colour palette is whatever colours nature gives me which tend to be more muted of course but not totally so.”

Jane was kind enough to share her process with us. Yay! Here the step-by-step of how she creates these amazing one-of-a-kind eco prints:
I soak my fabric in a mordant solution (kind of a setting agent).
Then I design how the plant material is laid out on the fabric.
Sometimes, I cover that with another piece of fabric that could be dipped in another solution.
Then the piece is rolled up tightly, usually around something like a stick, piece of dowel or copper pipe and tied tightly. This is done to get good contact of the plant material with the fabric.
My next step is to steam or simmer it for a couple of hours.
Finally, I get to unroll the piece and see the magic!
Check out this video of Jane’s process. I know you’re going to enjoy seeing how she works as much as I did!
Currently, Jane’s textile art pieces can be purchased at Craft Ontario's shop in Toronto, Dragonfly Arts in Orangeville, online at Localite in Vancouver and online through her website.

If you want to meet Jane and see her beautiful wearable art pieces in person, you can catch up with her at this year’s NGA Artwalk and Studio Tour taking place September 11 & 12 in Newmarket, Ontario.

If you’re interested in taking a workshop with Jane, you’ll be happy to know she’s back to teaching eco printing at the Southampton Arts Centre during the month of August. After Covid-19 curtailed her teaching, Jane’s excited to be back at it again!

If you’re interested in a commission, Jane does do them. You should know in advance that because of the nature of what she does, it won’t look exactly like any of the other finished pieces she has on hand. Since each leaf and plant material she uses to create her textile art is unique, so in turn is each one of her finished prints.

To see more of Jane’s work check out her website at www.janejacobstextiles.com
You can follow Jane on Instagram @janejacobstextiles.
To get in touch with Jane, email janejacobstextiles@gmail.com or call her at directly
at (416) 617-4886.
Final Thoughts
That was a lot of interesting info about the art of textile dyeing. And there’s still so much that we didn’t cover this time around. I’m sure we’ll get back to this subject again soon. There’s so much more to learn about it!
Here are a few more videos you might enjoy when it comes to dyeing. I know I enjoyed watching them. Let me know what you think.
Happy creating!!!
Eva
Enjoying the 3T Art Blog? Give this post a ❤ Like before you go.
If you’d like the 3T Art blog delivered right to your inbox every Friday morning, just go to evafolksart.com and sign up.
If you’d like to leave a comment, you need to be a member of the site. Please join us! There will be benefits to being a member of the site. Perks and special offers will be coming your way soon!